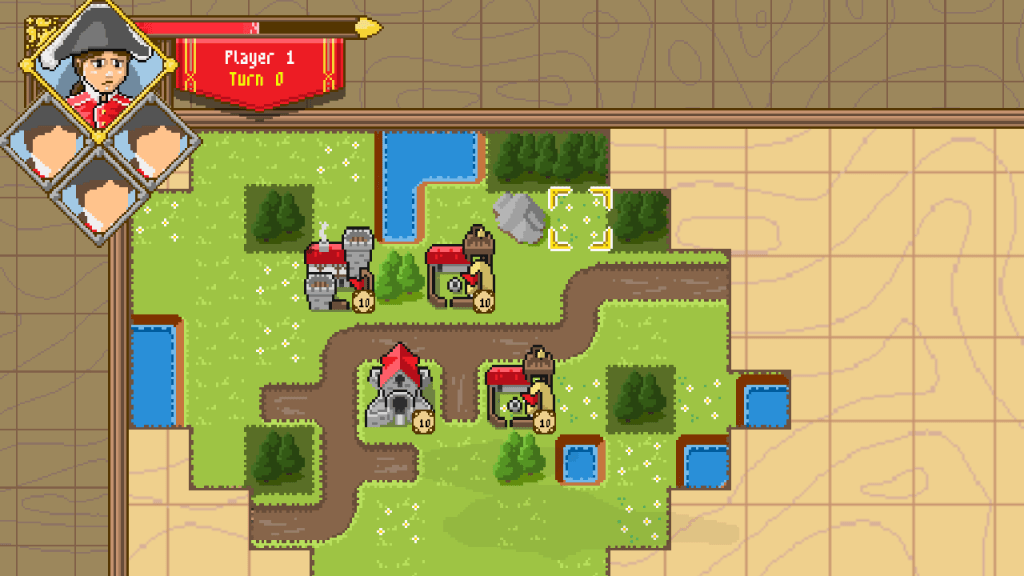
Project X is a tactical turn-based strategy game inspired by the Napoleonic era. The player takes the role of a commander who employs officers along their journey to enhance the capabilities of their army.
No two runs of the game are the same due to procedural generation and fog of war.
Independently designed by my brother and I, solely programmed by myself.
- Engine: Godot 3.0
- Role: Programmer/Designer
- Commitment: 2+ years of spare time

Concept statement:
Advance Wars meets Slay the Spire.
A tactical strategy game that takes the player through an up-hill battle to defeat the baddies where the decisions along the way have consequences.
Genre(s):
Turn-Based Strategy (TBS)
Rogue-lite
Target Audience:
Psychographics:
- Mastery: Difficult challenges and long-term strategies
- Achievement: Completing all missions and becoming powerful
- Immersion: Being someone else and experiencing an “elaborate” story
Demographics:
- Low twitch
- Players interested in deep strategic thinking with consequential choices
- It can be paused and saved anytime for people with busy lives
Unique Selling Points:
- Adapt and upgrade your army as you go through the missions
- No playthrough will ever be the same, change the way you play based on world events
- Engage in diverse combat scenarios made possible by procedural generation
- Level up your base to match your run’s playstyle
Emotional Beats:
- Courage
- Victory
- Unity
- Compassion
- Overcome
- Surprise
Major Systems
Project X is not complete, but this is an in-progress list of major systems needed to implement the game. With varied unit types, terrain types, buildings, and abilities, a scalable structure of systems was crucial. Systems also had to be designed with AI in mind to keep AI complexity feasible.
For now the game includes the following:
- Project Tree – Components
- Unit Movement
- Procedural Map Generation
- Ability System
- Construction
- Fog of War – Hidden & Unexplored
- A.I
- Battle Viewer
- Save & Load functionality
Project Tree- Components:
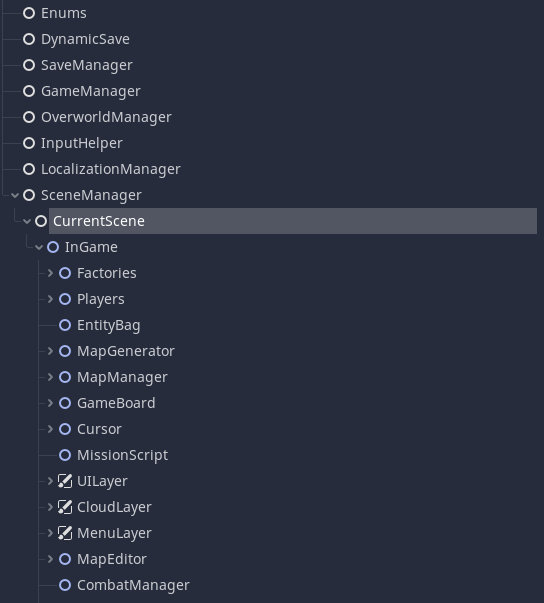
We have a few important pieces, first the “GameManager”, this one is a Singleton which its sole purpose is to keep references to various important other game pieces, once they enter the scene we register them with the game manager, so if we need to ask the Fog Of War a question we can reference it through the Singleton.
There would have been other ways to approach this, for example providing a certain class with all its dependencies (dependency injection), however for a “small” sized project this seemed to overcomplicate things.
Another important piece is the “GameBoard”, the GameBoard has various components under it which includes the state of the game (think of it like the chess board) as well as other important bits like the Entity Creator and AbilityCaster.
So if we ever need to instantiate a new unit we can ask the GameBoard’s Entity Creator to create one for us.
Usually abilities also need to care about where units are so the GameBoard also has the job of answering the usual questions of “Is a unit in range?”.
There’s one final piece that isn’t surfaced through the screengrab above though.
Even though we can directly ask these different components to do something for us, what happens if an UI element is interesting in knowing if a new unit is created?
In my case I decided to pursue and event driven approach, there’s a runtime object that operates as the event bus that every object can access to and subscribe to events.
If I want a new unit created I can generate a unit creation event that the Entity Creator will listen to, however other objects can listen in and do something when that event is fired off.
So if I need to update the population cap UI (basically a limit on how many units you can have), I can listen to this event and update it at that time instead of constantly having to do a polling approach or having the Entity Creator have to account for the UI update.
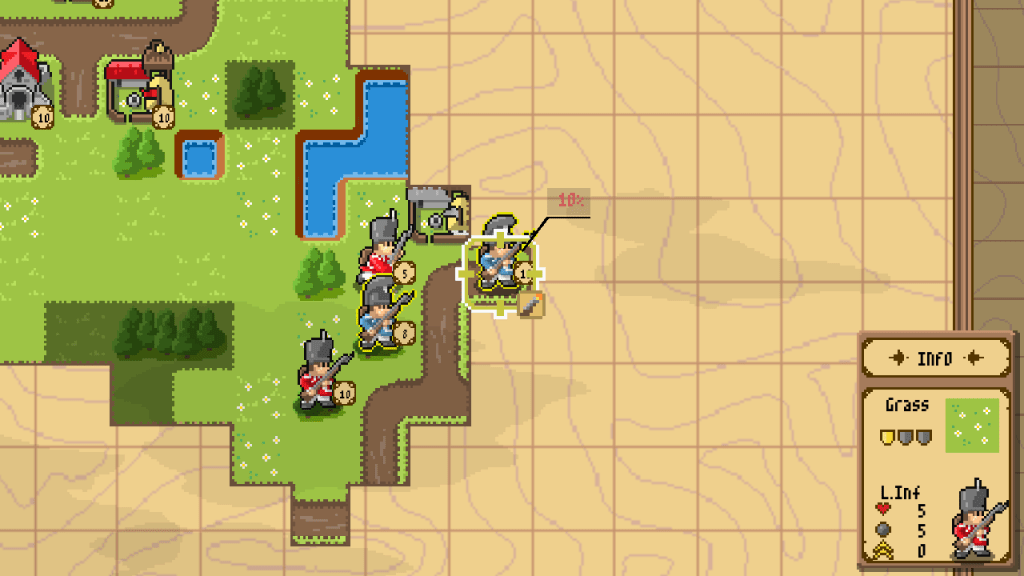
Unit Movement:
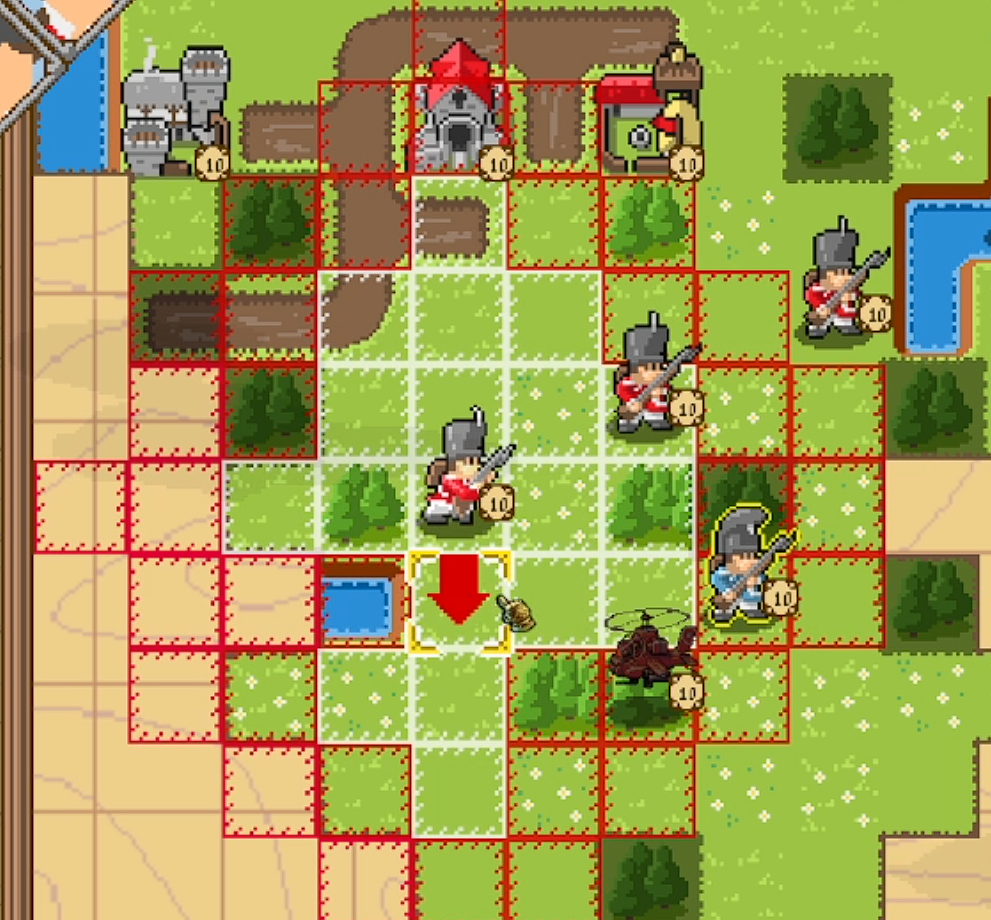
A TBS game has various components that need to be built from the ground-up, at its core its the movement.
The world in this particular case has tiles with different movement costs, in order to get an accurate representation of the actual tiles the unit can move to we employ a floodfill algorithm.
That sounds simple enough, but lets look at some problems that arise in the context of a game like this.
Problem 1:
What happens if we have enemies or structures around us ?
Solution:
In the floodfill we need to account for enemy units, as such it needs to have an idea of the gameboard, as such we pass the floodfill the current GameState, with this it can also check the alliance of the units, so that we can go over our own units but not enemy units
That accounts for one of the problems, lets have a look at another one that you would be faced with due to the existance of Fog Of War.
Problem 2:
What happens if we haven’t explored tiles?
Solution:
In the floodfill we need to account for tile visibility, if the tile is unexplored we count as 1 unit of movement, this disallows players from cheating by hovering the mouse over unexplored terrain and checking how the path reacts.
However, this doesn’t mean that a unit can suddenly go over mountains that would have a higher movement cost, instead the player can still select an unexplored tile to move there but he might not have enough movement points to reach the final destination, especially if the unit is not allowed on something like water tiles.
That is only part of the puzzle, we also need to manage the path creation, in this game it matters the path you take and not only going from point A to point B.
The arrow shows the player the path, if it collides with itself or the player goes back a tile then we re-update the path. Some extra considerations are:
- What happens with diagonal movement
- What happens if the player moves the cursor out of the movement area and then returns it somewhere else
For the first point its somewhat simple, we keep our path stored in an array and if we detect that the next tile is not just a +1 on the y axis or +1 on the x axis we have a diagonal movement which is not allowed, when that happens we use A* to give us the path to the new tile
For the second one we already have the answer as well, if the player moves the cursor out of the area and then re-appears somewhere else we clean the path and calculate an A* to the new square.
There’s also extra considerations with cancellation of movement.
Problem 3:
What happens if we are in the “pre-accept” movement state and we find an enemy that was not visible along the path?
Solution:
In order to not have the soldier teleport back and re-do the movement, if the player goes into the pre-accept, we interpret it as a movement with the caveat that it can be cancelled if you didn’t find enemy resistance along the way. That does mean that, if in your pre-accept, you find an enemy, we stop you on your tracks and your unit can no longer move.
Procedural Generation:
Part of the objective for this project was instilling a feeling of uncertainty on the player, I wanted players to face each engagement in a different way and a way to do that is to put the player in an uncomfortable situation where they don’t know the map or where the enemy might be coming from, this forces a need to use more scouting units.
Let’s analyze how the procedural map generation was implemented and afterwards dive into the challenges.
I’ll explain things by the same order in which I have implemented them, we first start with our first map generation type.. a land map!
Setting up our noise
A usual technique to introduce randomness in maps is through perlin noise, this gives a “random” gradient of values that you can use to feed into different systems, it looks something like this:

In the case of Godot, it uses SimplexNoise, which is the successor to perlin noise, simplex noise has many of the same properties as perlin noise, these are:
- Frequency
- Octaves
- Lacunarity
- Persistence
I’ll only go over frequency and octaves as they are the most relevant but feel free to research on the other two!
What is frequency?
Noise can be generated at any frequency, if you think of a function like sin(x), you can increase the frequency of the wave by multiplying x by a number, sin(3x), effectivelly has 3 times the frequency compared to sin(x).
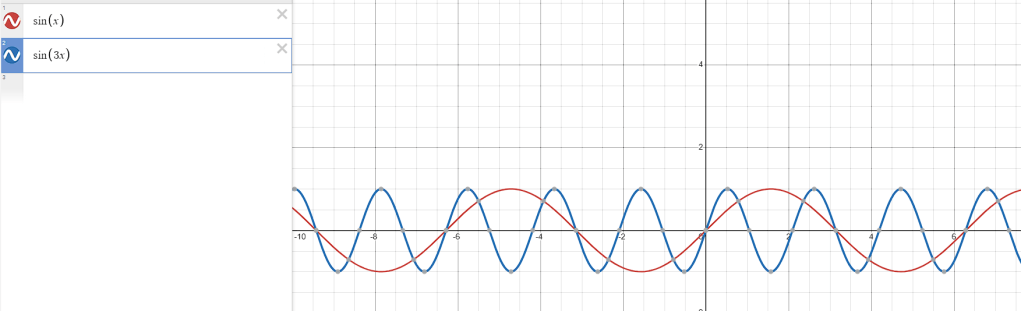
What it means in the context of SimplexNoise is that it basically “zooms” out the noise the more frequency you have, here’s two images, the first one is a low frequency example and the next one is a high frequency example:

This is because the higher the frequency the more you’re “squishing” the image as you would with the sin functions above.
For now this doesn’t seem terribly useful on its own but lets look at the other ones.
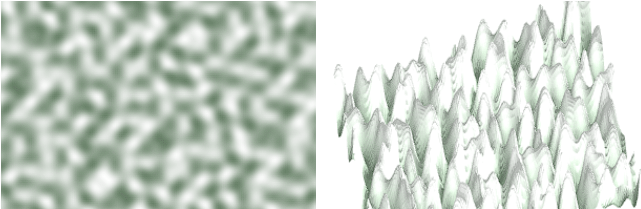
What are Octaves:
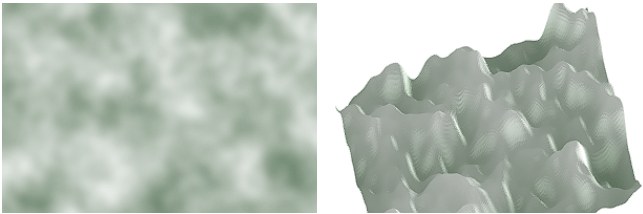
With just the frequency adjustment above you usually get what ends up being pretty flat surfaces, octaves is a way to layer over noise at different frequencies, so you might have something like this:

Another example:
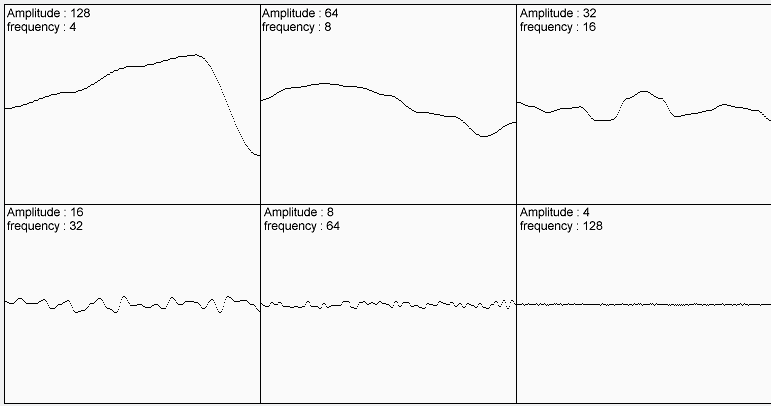
Which when added together creates something like this:
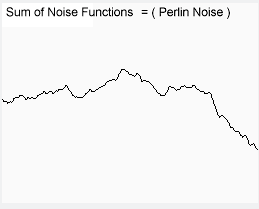
This more closely relates to how we see mountains/terrain in nature and just overall creates a more believable noise map. Using the same images as above, it might look something like this now:
With all the explanations out of the way, I did a simple mapping of the values from the SimplexNoise where if I read a value that is within 0 to 0.5 it becomes a water tile and from 0.5 to 1 it becomes a grass tile, we start to see where the noise is finally coming in. Finally, I adjusted the values above to get something that seemed to generate mostly land with small pockets of water (lakes). By itself it looks like this (one of the many random possibilities):
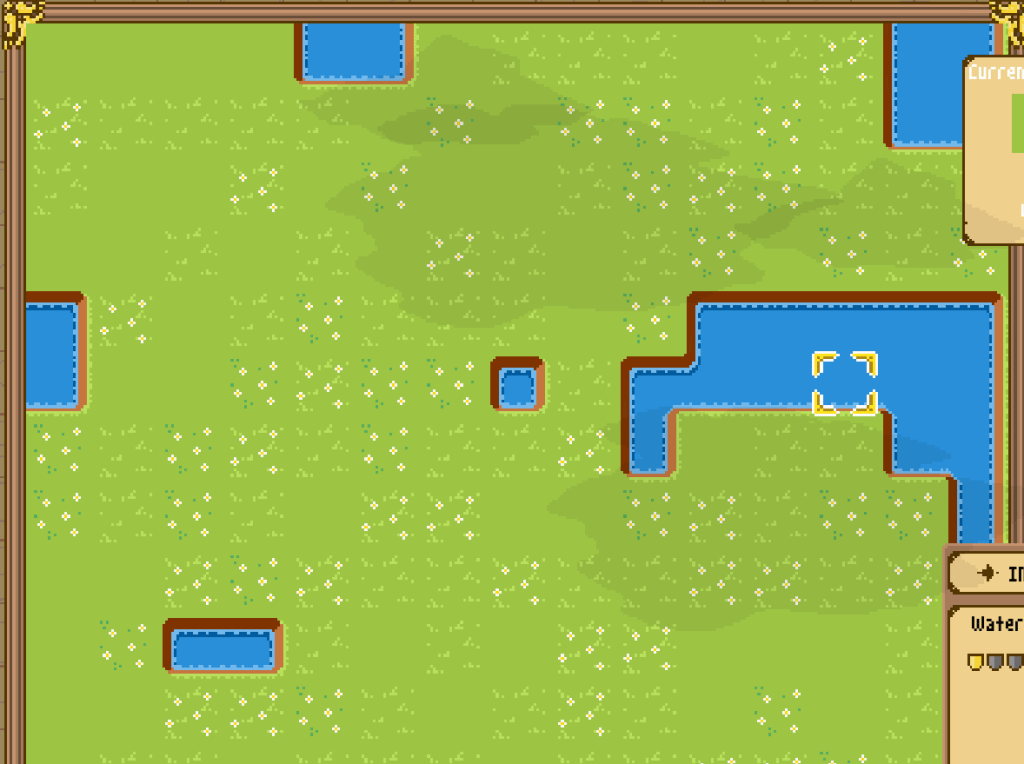
It’s starting to look like something, but still not very impressive.
Generating Trees & Mountains
For this game I wanted a more natural looking grouping of trees, I first tried using the same SimplexNoise that I used for the terrain but the results didn’t satisfy me. Either the trees were too “random” or the groups of trees were grouped up too much, this is partially because mapping the noise onto a grid with “small” resolution (24×24 tiles for instance) makes it lose some of the details of the noise that I’d want for a forest.
As a result I used another algorithm called Poisson Disk Sampling.
What is Poisson Disk Sampling?
The main property of this algorithm is that the points returned are tightly packed together but no closer to each other than a specified minimum distance, this allows me to regulate the density of the points. As we’ll see later this will become useful for yet another element.
There are two main steps to it, both of them are fairly simple, first we define a “virtual” grid, this is just the grid where the algorithm will run and where we can eventually map/transpose the points into our actual map grid. With that grid, we pick a random starting point and we start generating other points around it based on: min_distance, max_distance and angle.

We then repeat this until no more points are possible to be generated, so the first point might find that it can generate 3 points around it, from those 3 points it might calculate that only 2 can be fit without colliding with the radius of the previously generated points and so on.

Eventually we end up with a neat function that we pass a width, height, minimum_distance, how many points it should attempt to generate around each point and returns a list of points.
Finally we can use this to generate our mountains and trees with different densities, if we want a map with denser forests we decrease the minimum radius needed between points.

River Map
Continuing off the land map we have.. rivers!
I wanted something simple but efficient, I should be able to tell the map how wide I want the river and how much it “curves” (in other words its wiggliness) along the path, that makes the river feel more natural.
For this algorithm I made use of three simple cell states:
- Open – Still open for the river to pass and for evaluation
- Forced – Means we’re forced to take this cell for our river path
- Blocked – Means we can’t have the river pass through this cell
Here are the steps for my river generation algorithm, essentially what it does is that based on a wiggliness value it chooses cells near or far away from the original river path to block, if it blocks a cell it means the river now needs to find a way around it (essentially adding the curves to the river).
- Step 1: Choose a start and end point, set them as Forced in our CellStates Matrix
- Step 2: Generate path that avoids Blocked cells, the internal steps are as follows:
- Step A: Calculate 2D Matrix with distances from our starting cell to other cells on the grid
- Initialize 2D Matrix called Distances, this a Matrix that maps the distance from our starting cell to another cell on the grid
- Grab one Cell from CurrentCells (first iteration takes the start cell)
- Get Neighbours (ignores neighbours that are blocked)
- Updates Distances matrix with neighbour and currentDistance + 1
- Update CurrentCells with neighbour cells, meaning that next up we’ll evaluate the neighbours.
- Increment CurrentDistance by 1
- Stop when we have a distance calculated to our end point.
- Step B: Calculate path
- Set end point as CurrentCell
- Get Neighbours that are within a distance of CurrentDistance – 1 (meaning one step closer to being at our start point)
- From those neighbours pick a random one
- Append to path
- Subtract one from CurrentDistance
- Step A: Calculate 2D Matrix with distances from our starting cell to other cells on the grid
- Step 3: Set a cell Blocked or Forced
- Step A: Run function that based on a wiggliness value is more likely to return a cell either near the path or further away from the path
- Step B: Set Cell as Blocked
- Step C: Re-run Step 2 function, if it returns a path we are happy, if it doesn’t means that we have blocked too many cells for the path to possibly go to the end point, given this we set this current cell as Forced instead of Blocked.
- Step 4: Repeat from Step 2 until none of our CellStates are Open
- Step 5: Go through the generated path and had width to the river by setting neighbours as water tiles depending on the RiverSize variable
This returns us what should be a pretty natural looking river, with a pretty simple process. This is the final result!
Island Map
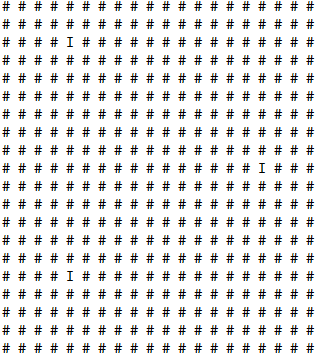
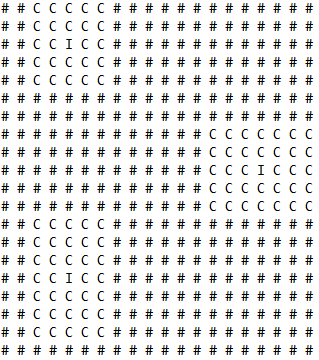
There are many resources out there on how to generate natural looking islands, I ended up with something fairly simple but also that brings good results. First we need to calculate the center of the islands, thankfully this job is made easier by the use of the algorithm we described above called Poisson Disk Sampling, we can pass along the number of islands/points we want to generate and a general distance between them. These are two very important tunable values.
This should return something like this, where “I” denotes the center of an island.
Given these island center points, its now important to generate Chunks around them. The size of the Chunk will determine how big the island is, not only that but its here where we can add some randomness to our island size by adding a delta value, this means we can have an island size of 4 and a delta value of 1 and that will generate islands between the size of 3 to 5. This gives us some variability.
Visualizing that, it should look something like this where C = Chunk.
After we are done generating our chunks, we can start generating the actual island, for this there are a few steps. The overall goal is that we want to have something to pass along to a “Shaping” function to give us the shape of our island.
First we iterate through each Chunk and calculate the distance of each tile to the center of the island, for that we make use of this function:
nx = 2*x/width - 1 and ny = 2*y/height - 1
This will return a value for x and y between -1 and 1, where -1 is the left(x)/top(y), 0 is the center of the island and 1 is the right(x)/bottom(y). Its important that these values are between -1 and 1 for the next function.
After we have those values calculated we can pass them to our Shaping function, the shaping function I used is called Square Bump and essentially returns 0 at the center of the island and 1 at the furthest point, it also has the nice property that the edges will be round.
d = 1 – (1-nx²) * (1-ny²)
Testing this will return us something like this:
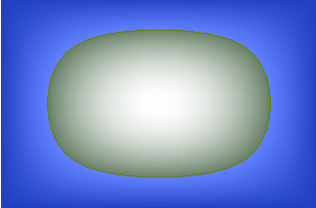
It has the overall shape of an island but its too perfect of a shape, we need to roughen it up a little bit.
This is where our next step comes in, we grab our SimplexNoise and attribute it a weight between 0 and 1, we grab our d value from the function above and we also attribute it a weight between 0 and 1.
A value of 1 for the noise and 0 for d, will return you purely all noise, a value of 0 for noise and 1 for d, will return you the perfect shape above, and finally a value in between is basically noise fighting over with the d, we can have the scale linearly. The result of that looks something like this:

Finally we go through the usual steps that every map does which includes:
- Generating player bases
- Generating forests
- Generating mountains
- Generating neutral structures
To see how everything comes together, we can see some of the results:
Peninsula Map
Finally the peninsula map becomes really simple given the road work made above, Its somewhat a combination of the “tools” gained. We picked a starting location on one of the edges of the map, this will gives a peninsula that start from top-to-bottom or bottom-to-top or left-to-right or right-to-left.
We then make use of island generating logic and give the island values more of a rectangular shape, and finally we adjust the “roughness” to something that seems more like a peninsula which gives us something like this with water on the outer edges of land.
Ability System:
The ability system is another core system fundamental to the game. Similar games like Advance Wars only have one way a unit can attack but in this game the concept was to have both a melee and a ranged attack.
The way abilities work is split into two parts, the first one is closely connected to the GameBoard and is called AbilityCaster, this layer is supposed to take care of the targeting of the abilities, asking the question of what abilities a unit has and if an ability can be used against a certain target.
This ensures that if core logic changes it applies to every ability in the game.
The second part is the Ability script itself which stores all the information, some examples would be:
- Ability name
- Ability icon
- Min/Max Range
- Cooldown
- Ammunition Cost
- UI related properties like menu ordering
- …
This is how it looks in the editor:

Ability:
One of the important components of the ability is the RequirementsHolder, this is an object that many other systems in the game make use of, in the image above this object is inserted into the first slot and looks like this:
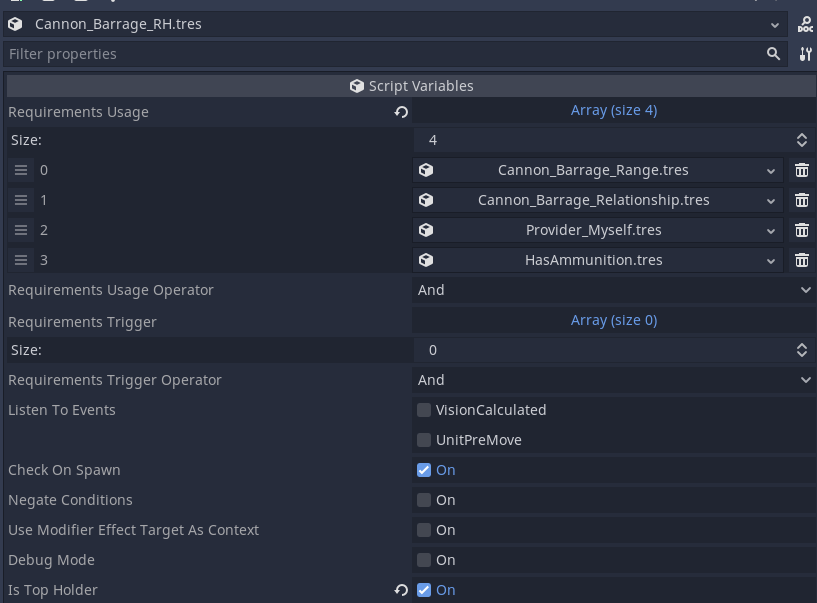
The RequirementsHolder is a more data-driven approach at setting requirements for different things, in this case it has four requirement objects, these can be authored by a designer to do the needed logic while a programmer would only need to author the “lego” pieces. For the example above we make use of a Range requirement, a Relationship requirement, a pointer to populate our context (more on that after), and a Has Ammunition requirement.
Before diving into how those are built lets look at the rest of what the RequirementHolder has to offer.
- Requirements Usage Operator: Tells us how we should evaluate the requirements above, should we do a logical AND or OR ?
- Requirements Trigger: Functions the same as Requirements Usage, but its used for abilities to check if they should trigger an extra effect, essentially requirements usage would ask “Can I use this ability on this unit?” and requirements trigger would ask “I have attack the unit do I meet the requirements to trigger a payload (such as poison)”.
- Requirements Trigger Operator: Same as the requirements usage operator, only this time for requirements trigger
- Listen To Events: This is linked to the events of the game, if a unit pre-moves or vision is calculated (usually happens after a unit finishes its move), we can ask if our conditions still hold true, if they change from a true to false we can notify the ability, this might be important for the ability to stop doing its payload (in the case of a passive for instance).
- Check On Spawn: Should we run the requirements when the unit that holds this ability spawns ?
- Negate Conditions: Should we negate the final result of the checks on the requirement usage or requirement trigger
- Is Top Holder: Is this the top-most RequirementHolder, this is admitelly something that the system should handle but for now I have kept it as something the designer (which would be me in this case), needs to be aware of, this is because you can have nested RequirementHolders and we need to know when to stop processing signals from the RequirementHolders that are below the main one.
Requirements
Requirements are code-written logic that can take different parameters and interface with the game state, this is important to have decoupled from the main pathways of abilities because it makes it easier to add new mechanics to the game down the line, if we add a mechanic where certain abilities can only be used in different terrain types we can now add a new “lego” piece called IsTerrainType and start using it on our ability requirements.
Lets look at two examples:
HasAmmunition

- Requirement Operates On Type: Are we asking this question to an Entity, Position, Player or Ability, this is a setting that is part of the base Requirement class, and it exists because some requirements might actually respond differently depending on who we’re asking, we could be asking to operate on the player instead.
- Get Target From Context: Where should we get our target from.
- Context Provider: Gives us the target of our current context. Each RequirementHolder has a context, by default it is the target of our ability but as we’ll see in the next example we can override it.
- Request Holder Owner: Give us the owner of the RequirementHolder object, so if Unit A has Ability A(holder) with RequirementHolder A we would be getting the Ability A.
- Request Holder Owner Parent: Essentially the same as the above but going one extra layer up, so we’d be getting the unit A
- Ammunition Value: Ammunition value that we’re going to be comparing the unit against.
- Operation: Does the unit need Greater/GreaterOrEqual/Less than the ammunition value

Overall writing a new “lego” block is easy, we extend our base Requirement class and override the CheckRequirementCondition function, this is the function that a RequirementHolder is expecting to call from its requirements.
We first verify if the target we got is what we’re expecting, then we get the reference to our target and finally we do the checks and return a result.
Provider_Myself
As mentioned above we have the concept of context, this “Requirement” is in fact not a real requirement and is ignored by the requirement check, however it does write to our current context, in this case all we’re doing is saying “Please write ME as the context”, “Me” in this case referring to the owner of this ability.
Lets have another look at our requirements to finally understand what’s going on:
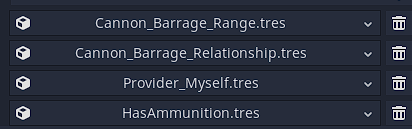
- Ability by default when targeting something writes it to the Context.
- Cannon_Barrage_Range: Is the target in our Context in Range?
- Cannon_Barrage_Relationship: Is the target in our Context our enemy.
- Provider_Myself: Please now replace our Context with myself (the ability caster)
- HasAmmunition: Does the target in our Context (which is now the user of the ability) have ammunition to use this ability
Special Ability Logic
I won’t go over every field on the images that were placed above but this one is also worth calling out.
Challenge: What happens when we want an ability to do something else other than interacting with the Damage System ? e.g: I want to build something
This is where the special logic comes in, special logic is a type of payload the ability can execute once it triggers.
Instead of just being able to interact with the damage system, we can now make it run another type of “lego” block which we can also author whenever a new mechanic is introduced into the game. A perfect example for this is when an ability wants to build something.
The steps to make that happen are fairly easy, we create a Special Logic of type RequestConstructionSpawn, we link it to the ability and on the RequestConstructionSpawn object we specify which building we want to spawn.
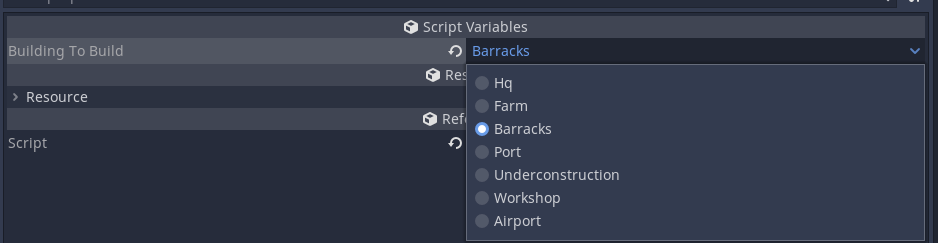
This is essentially how the Sapper in my game works, it has a build ability that when triggered will execute this piece of code. The ability just needs to run this if we tell it that we want to run Special Logic.
This ensures that the abilities can interface with other game systems without changing the ability script.
This ended up being super useful, because I can now make everything in the game… an ability!
The movement of the units is an ability with a special logic block that interacts with the movement system, this would essentially mean that if in the future I added a mechanic where units got tired then I would just need to add a new Requirement type, add it to the ability requirements, and now you can only move if you’re not exhausted!
Entering ships and APC’s is an ability with special logic to interface with the transport extension of the units, so any new special requirements for that system can still be handled by the ability system.
Hopefully you now get the idea of how this can be used, it essentially makes it so that various new systems in the game can go through the same ability pipeline since they would most likely also ask very similar questions to normal abilities.
Ability: “Hot Swapping”
An easier way I found to create game logic and balance abilities was to allow modifiers to buff abilities, under the hood this means that a modifier can say if this unit has the Ability A-1 then please now use Ability A-2 (which would be Ability A-1 but perhaps with different damages and VFX).
Challenge: What happens if the modifier kicks in AFTER the player has selected Ability A-1 though?
This could happen in cases where the modifier requirements are “My Target is X unit”.
This is where the Hot Swapping comes in handy, if a requirement is now buffing your Ability A-1 after you’ve selected it then it changes the reference to be Ability A-2.
To give an actual example, let’s say the Salvo of a rifleman deals 50% damage against another rifleman but deals 50% against cavarly AND makes them explode on death (for a silly example), to avoid an over complicated ability that checks for target type and does a wildly different effect we instead keep them seperate which is easier for balancing.
Considering that example we need to hotswap the ability on the fly while doing targeting, so the AbilityCaster handles on target swap events and checks ability requirements, so even if we initially started the targeting with Ability A we can swap it midway through before we get to the phase where we send the Ability through the CombatManager.
BattleViewer System:
As part of immersing the player on the actual world this feature is fairly important, it gives a connection to the player that the “singular” units they are controlling are actually fairly big squads of soldiers.
This system in particular has a few requirements:
- Different units have different attack patterns, a horseman might charge the enemy, a rifleman might fire their weapon and some units might not be able to fight back altogether.
- Different units have different squad sizes, a tank might be a singular entity while a rifleman squad might be compromised of 10.
- If a unit has less than their maximum HP, we need to initialize the battle with the right amount of entities.
- Even though this is a purely visual representation (since the battle outcome has already been calculated), we want the damage to only happen when the entities actually perform their attack.
First comes the part of defining unit behaviors, where should we place that logic?
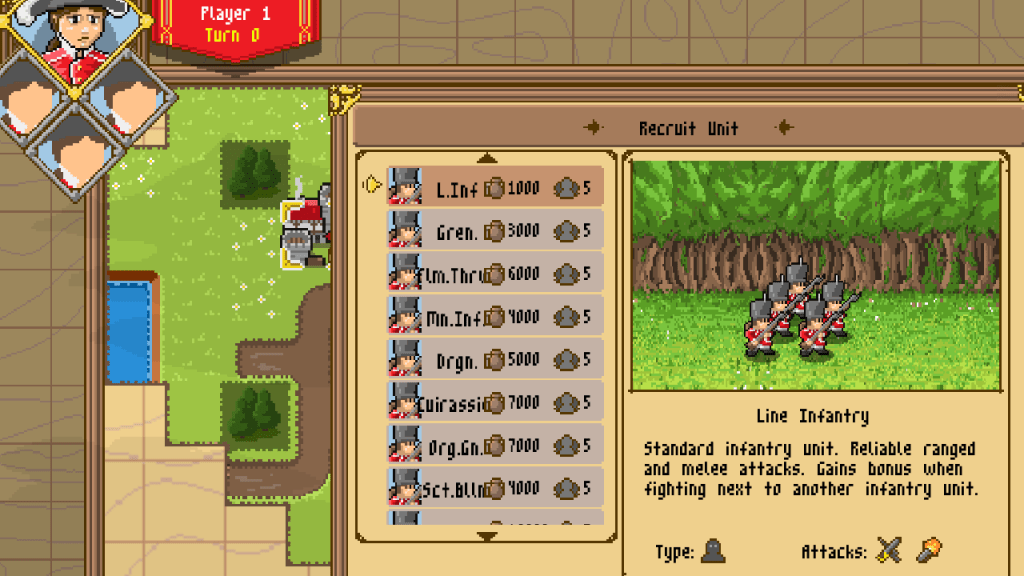
We could be tempted to put it directly on the unit, however because other elements might be interested in this information, I didn’t want to place it in a location where I’d need an initialized instance to ask the relevant questions, for example in the barracks unit preview we show the actual number of entities before you buy the unit.

So a better location was on the UnitOverview data class, this is where we define we a unit gets produced, their cost, among many other stats.
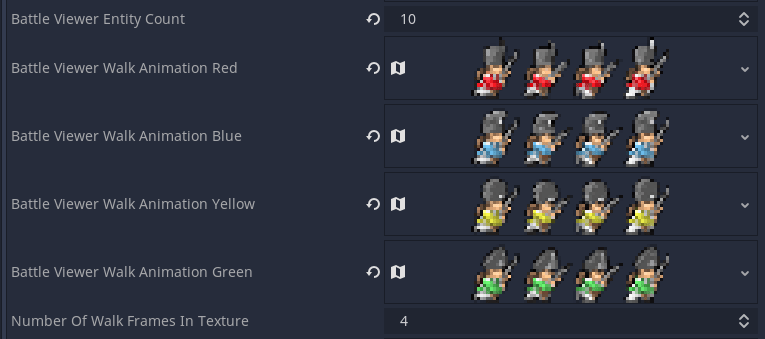
Here is also where we get to define the animations used by the unit.
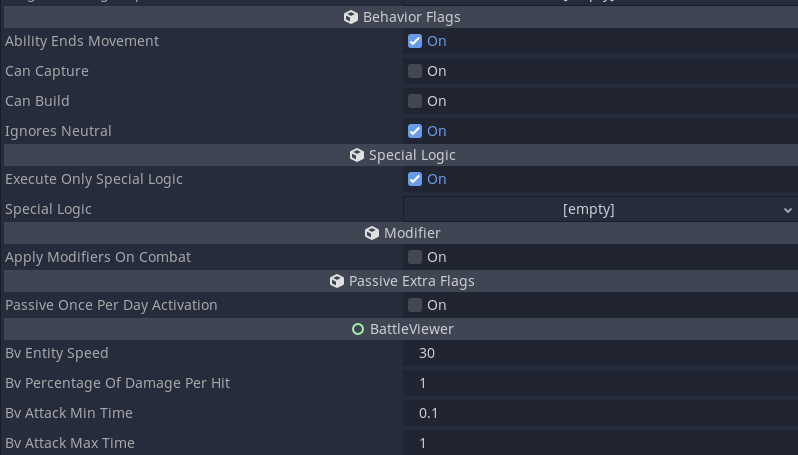
However we’re still missing something important which is where do we define if the unit will charge, or fire, or use some other behavior. Given that our units can have different attack types, meaning that a unit could potentially both fire and use melee, it makes sense that this would be a per ability choice.


Not only do we define the attack type but we also have a few extra parameters, “BV_PercentageOfDamagePerHit”, “BV_AttackMinTime” and “BV_AttackMaxTime”. These tunables allow us to give the same attack a different presentation, we might want a tank to fire once and deal its full damage (BV_PercentageOfDamagePerHit = 1), or we might want a melee unit to slowly dish out the damage once it has gotten to melee range.
Finally given all this data the battleviewer can operate, we follow these phases:
- Battle clean up: make sure that no “visual” entity remains from the last battle
- Set a battle requested flag to true (important because of the possibility of multiple battle requests given that our battleviewer currently doesn’t stop gameflow)
- Figure out if the battle is a melee one, if so remove the central divider
- Update the backgrounds based on the tiles the units were on, if its a melee battle use the background of the victim
- Calculate number of entities based on the UnitOverview entity number and the unit current HP
- Spawn the entities
- Calculate the damage each entity needs to do based on the unit’s damage dealt and the “BV_PercentageOfDamagePerHit” variable
- Attribute a health pool per side
- Update UI elements such as shields, health bars, portraits.
- Show the screen to the player
The rest of the logic is on the BattleViewerEntity class that handles how the entity moves on the battlefield, depending on the BV_AttackType its either going to fire, go melee, charge or do nothing.
The logic is pretty simple, although it took a while to get it to look good. For the most part entities will try to attack the target closest to them, if they have a friendly entity between them and the enemy then they will wait. This creates a feeling of frontline.
For cavalry they will charge to the end of the screen, come back and do another charge repeatedly until all their damage is dished out.
Here’s melee and salvo in action.
Here’s charge (even though this is going to be used for cavalry and not infantry).
Modifier System:
The Modifier System is at the heart of many things in the game, from structures healing/repairing units, to poison effects, to increases in damage (buff) and decreases (debuff).
This was by far one of the most challenging systems to fit in the game, some of those reasons are in terms of keeping tab of states when the player cancels actions, keeping track of who should “own” the modifier (more on that later), removing modifiers, loading a game state and have the modifiers load properly among other challenges.
In essence the Modifier System could be broken down into these components:
- Virtual Modifier – these classes extend Modifier : Aura, Effect and Global
- EffectModifier – Parent class of “Effect”, handles some of the rules of who should the effect apply to (buildings or infantry for instance)
- Effect – This has the actual payload (remove 1HP for example)
There’s still one extra component that is needed, that is the Modifier component that any entity that wants to be able to be affected by modifiers should have, the component’s sole purpose is to keep track of the modifiers the entity has and access to methods like “RemoveEffect()” or “AddEffect()”.
Challenge: Now to an important question, who should own and keep track of the lifetime of a modifier ?
Lets consider the following example, unit A attacks unit B and applies a poison effect, in this scenario we could think of giving the modifier to unit B and let it keep track of it, which is a correct assumption.
Keeping the same line of thought, lets imagine unit A has an Aura effect that decreases damage of enemy units in a radius, we can give the debuff to unit B and let it keep track of it, however what happens when unit A dies?
Surely unit B shouldn’t be the one keeping track if unit A dies.
That’s precisely why modifiers are a little bit more tricky, in this case unit A needs to remove the modifier from unit B on death.
That is why the life cycle of a modifier is controlled in two different places so that we can accomodate these cases.
Another question that needs answering is, lets say a unit has 50% increased damage while in mountains and this applies to every ability the unit has (melee or ranged), the player moves the unit to a mountain and targets an enemy, the damage preview should already have the modifier factored in.
This means that we need to add the modifier before the player has locked in their action and is still thinking about it.
However lets imagine another scenario, a unit has extra vision when on mountains, the player moves the unit to a mountain, in this case we only want the player to benefit from the extra sight range if he actually looks in his action to avoid exploiting the game.
In that scenario the modifier should only kick-in when the player has locked his action in.
This where our friendly Requirements that the abilities also made use of come into play. Modifiers can also have requirements for activation. So in the same way we have a Data Driven approach that might look a little bit like this:

In this case the modifier RequirementHolder is listening to game events like vision calculated (which happens after a unit is moved) and only then does it verify if it meets the Modifier requirements, if it does it sends a signal that is listened to by the ability and then triggered.
Going back to our initial paragraph there’s still some questions that need an answer. What happens if I move a unit to a square without locking my action in and then cancel the action. We might have damage modifiers that applied to the unit already for damage preview purposes.
In this case we need to remove modifiers pretty dynamically. This is done through the Modifier component we referenced above, what it basically does is it keeps the original state saved (so basically our unit without any modifiers added in), removes the wanted modifier from the list and then re-calculates the effects again, at this phase we also need to be careful not to activate modifiers again (say if the poison were to tick one more time).
Save System
Saves systems are tricky especially if you have done your project without any considerations for how you are going to do this in the future.
In the case of this game thankfully its not a super complex game but its also not a simple one, just an example of things we need to keep track of:
- Ability States
- Modifier States
- Construction States
- Entity States
The problem becomes worse when you start thinking that some of these are dependent on others in a somewhat cyclic way. Another problem with modifiers specifically is lets imagine we go with the “naive” approach of loading in a unit, then re-applying the modifiers it previously had. If that modifier was a poison effect that had an instant trigger effect you might have the effect apply again, which is undesirable. However we obviously want to keep damage buffs and debuffs.
Challenge: How do we properly load modifiers if we have modifiers that trigger when applied opposed to just triggering at a certain game phase
To avoid that we load things on their exact previous state without going through the usual in-game “ApplyEffects” pipeline which would have been the naive implementation.
As such when we are loading the game we have these three phases:
- Instance initialization
- Static data loading
- Reference loading
Instance Initialization
At this phase we go through our save file and initialize the objects of the same type, if the save file had two rifleman units then we initialize two rifleman unit objects with default values. In the case for this game in particular we need to initialize: gameboard, player instances, ability instances , effect instances and modifier instances.
While initializing these instances we add them to a dictionary of type {ID:Reference}, this will be needed for the next two phases. The reason why we need to have this “linkage” is because the object ID that the engine attributed on the last play session is not going to be the same as this one that we’re now loading.
So we look at our save file, check what object ID it had when the player saved the game for a particular object and insert it on the dictionary.
Static Data Loading
At this point we have the objects initialized with garbage data, so its time to start filling it up. We now start looking at the Object ID’s on the save file, grabbing the instance that is now related to that ID and load in our basic type of data, that includes ints, floats, enums, strings and so on.
This does mean that many of the objects in the game need to implement the load and save functionality, since you might have something like Unit (that includes Team, Owner) -> StatsBag (that includes HP, Damage), all these objects that were associated with another object needs to have their values loaded in.
Reference Loading
In this last phase we now have all our puzzle pieces created but not connected, a certain unit might have its static data loaded in and that unit StatsBag might also be ready to go but they are not connected. For this part we again make use of our handy dictionary, as part of our save process when we encountered cases where it was a reference/pointer we instead saved the Object ID that it was pointing to, which we can now use to search in our dictionary for the corresponding object.
When its all done we should have a game state that even though has different Object ID’s they are all connected in the same way.
This type of loading does mean that anytime you create a new class that is supposed to have permanent data, you need to implement the save and load function and tag the object as “save”.
- We initialize all instances again, this means instanciating the player objects, Units, Buildings, Abilities, Effects and Modifiers.
- We grab the initialized object that has their default settings and load in the actual values, for example unit A was initialized with its default values of 10HP and now we load in their actual current HP, position, team etc. I call this loading their static data.
- Finally we load their dynamic data, also known as references. So given all the objects we now start connecting them, this is done through keeping track of object ID’s on save, so now we can search a dictionary of what object ID matches what object and re-connect them
AI:
AI was always an interest of mine, every AI in a game is different in some way and it needs to accomodate the emotions you want to invoke in your project.
In a strategy game like this one often the problem is how to make an AI that actually uses the units in a competent way, doesn’t walk them in alone/has a plan, knows what to build among other scenarios.
In the case of this project the AI is broken down into three components that operate sequentially.
These are the components:
- Production Goal
- Production Phase
- Unit plan attribution
- Unit Phase
For the Production Goal the responsability is quite simple, what should the AI be focused on?
This is somewhat a challenging problem because at certain points it might be better to counter what the enemy has but at other points we might want to save some gold for a powerful unit. Its the balance between the two that makes it challenging.
In this case I went with a bit of a math equation, the longer the games goes the more the AI wants to do more costly units, however if the we would take too many turns to get a Unit then it becomes less desirable, on the other hand if a unit heavily counters what the enemy has then it becomes more desirable.
That way when we start the game we like building cheap units and as the game progresses the AI starts fielding better units, if the enemy starts capturing our farms though (what generates us gold) then we don’t want to be “stuck” wanting high cost units since we’ll never get to them.
After having our goal set-up the production phase kicks in, this one takes the production goal and figures out the best way to get there and produces the units.
We perform a BFS algoritm on a tree composed by nodes, those nodes are “GameStates” with the connections being “Actions”.
For example I might want to build a tank as my goal but I don’t have the gold yet. In this case we’ll start searching for the “path of least resistance” , balancing units we can build along the way as well as the number of turns that it takes to reach our Goal.
Here’s a clear example of two decisions the tree might be weighting against each other:
Decision 1:
- Turn 1 – Build Rifleman ( -1000 Gold)
- Turn 2 – Wait (+ 2000 Gold)
- Turn 3 – Build Tank (- 5000 Gold)
Decision 2:
- Turn 1 – Build Rifleman ( – 1000 Gold)
- Turn 2 – Build Rifleman ( – 1000 Gold)
- Turn 3 – Wait
- Turn 4 – Build Tank
Even for a human it can be hard to figure out the best path, in one of them you get to the tank faster but perhaps you lose more “map control” or field presence on your way there. This becomes more complex when you consider this plan needs to adapt to what the enemy player is doing, what if the player fielded a really powerful Air unit and now the tank would be an easy target for that.
Another consideration this algorithm needs to have is that we might not have the requirements for our Goal, lets say we want to build a castle (since our game has construction) but we lack the unit that would do it. This production tree needs to know that the castle has a requirement that you need a worker to build it.
Going past the production, we now get to the unit “plan” attribution phase, this is where the AI evaluates the map and goes “Unit A should scout, the map is too dark”.
Alternatively the AI might go “The enemy is pressuring me too much, I need more units on the offensive”.
After this phase is done we get into the actual unit moving. Based on the plan attributed to them they weight their options accordingly, if they were tasked with attacking then the unit will highly prefer to attack enemy units. If they were targeted with capturing farms then they’ll rather do that versus attacking an enemy. Keep in mind that even “capturing” plans could still mean the unit might attack when met with the scenario where it has nothing to capture around it but it has enemies.
Finally and perhaps the biggest question is “How does the AI know where to send units?” and following that up “How can we make sure the AI doesn’t suicide units”.
This is where a really handy tool comes in called Influence Maps. Here’s how an Influence Map might look like:
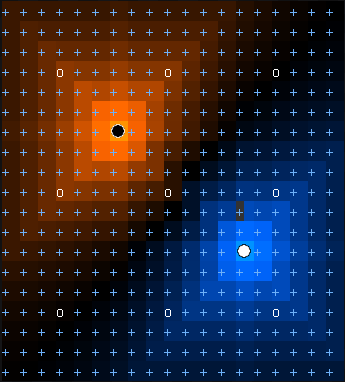
In essence this calculates how strong an enemy’s presence is in a certain tile versus yours. If you have a good presence in a tile and the enemy has a weak presence perhaps that’s where you want to attack.
Another very useful case for this is with construction. Lets say you want to build a tower near the frontline, how do you know where the frontline is ?
Well with this map you can calculate where your strength and the enemy strength meets.
For more on this read this!
https://gameschoolgems.blogspot.com/2009/12/influence-maps-i.html
Another consideration with AI is how it handles fog of war, in the case of this AI I didn’t want for it to cheat, however we have something that AI doesn’t have “intuition”.
A really easy example is, I attack you with a unit in the forest that is covered in fog of war, as a human you know more or less where this artillery unit might be, an AI however wouldn’t know and it would just get attacked on repeat.
In this scenario we can… also make use of our influence map!
When an enemy attacks us we update our influence map even if the unit becomes covered in fog of war again, so we know that something is there.
This somewhat finalizes the high level explanation of the inner workings of the AI, we are however glossing over some cases that you might be met with.
- Handling Utility units, how can I make sure my AI uses and knows about transport boats/carriers
- How does my AI know when to retreat units
- How does my AI handle all fog of war scenarios.
